
As we’ve mentioned before, a soldering iron is a handy tool for musicians, especially for those who are on the road. When traveling you don’t always have time to go to a repair shop when something breaks or isn’t working. We recently talked to a customer who uses his model 7700 soldering iron to make audio cables for his band. I thought that sounded like an interesting application, so I thought I would write a quick guide on making and repairing audio cables.
Click here to purchase the 7700 Iron!
Preparation
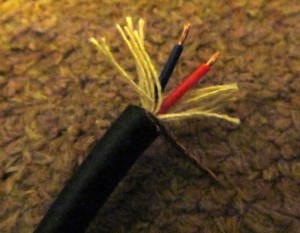
The first thing you’ll need to do is cut the wire to length. You should do this with a sharp knife or wire cutter. Scissors tend to not be sharp enough, so I wouldn’t recommend using them. Next, remove the outer jacket. You can use a knife or wire strippers for this part. Just be careful not to cut into the wires themselves. You will then need to twist the braided shield to form the ground wire. Use your knife to remove any excess material. Strip the insulation from the inner wires and then tin them.
Soldering
At this point, it’s time to solder the wires and connector together. You may want to get some helping hands to hold the wire steady. Make sure to hold the connector in place until the solder cools. One you’ve made the connection, give the wire a slight tug to make sure everything is secure. Congratulations! You’ve got yourself an audio cable. Be sure to perform a continuity test and then your cable will be ready to use.
Repairing
If you’re looking to repair a damaged audio cable, simply cut off the damaged section and then follow the same process as you would for making an audio cable.
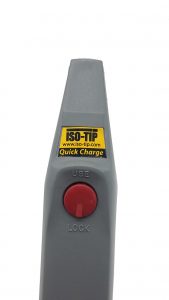 Model 7700 Soldering Iron
The Quick Charge Soldering Iron Kit is the world’s #1 rechargeable soldering iron kit designed with the professional in mind. The 7700 cordless soldering iron kit is our basic unit and the biggest seller for a good reason. We like to think of it as the “crank up window” of our soldering irons. It’s dependable, bullet proof and has an easy battery charge. It doesn’t have all the bells and whistles our other models feature, but it gets the job done and done well. The 7700 soldering iron kit fully recharges in 4 hours and outputs 125 solder joints per charge.
We also feature this soldering iron in a handy tool kit for on the go jobs. Click here to learn more!
Know of any other music related uses for a soldering iron? Be sure to leave us a note below.